4.4 KiB
+++ title = "Using ranges" description = "How to create and edit range selection in Ardour" chapter = false weight = 4 +++
A range is a selection of the timeline that can include one or more tracks. It has many uses like selecting a portion of audio/MIDI data to cut it.
{{< figure src="en/ardour7-range-example.png" alt="Range example" >}}
Creating ranges
There are two common ways to create a range:
-
You can do it with the Grab tool (G shortcut) when the Smart mode is enabled. In that case you need to position the mouse pointer around the middle of a track vertically to start selecting data rather than picking and moving a region. The mouse pointer looking like a vertical line means you are good to start selecting.
-
You can also use the dedicated Range tool (R shortcut). In this case, just click and drag anywhere on the canvas to start selecting.
You can select data of multiple tracks at once as seen on the screenshot above. To do that, just drag the mouse pointer upwards or downwards crossing the border between tracks.
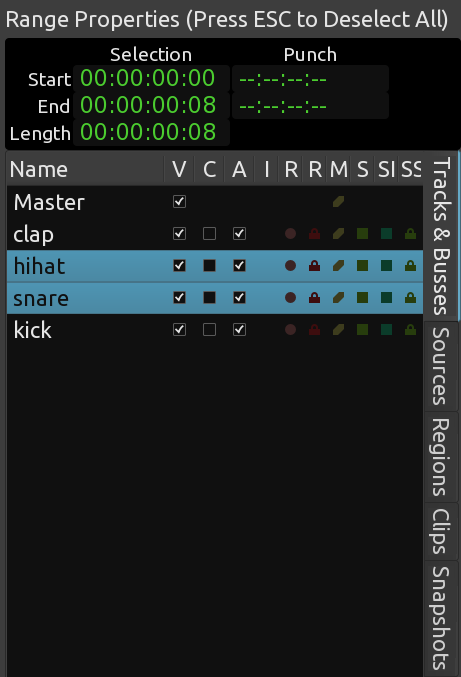
When the Editor List dock is available, you can see range properties on top of it: start/end times of the range as well as its duration. When a range is created, the Tracks & Busses tab will also select tracks that the range crosses.
It can be useful to create ranges that align with the edges of regions on your timeline. To do that, enable the Snap option in the toolbar and select No Grid in the drop-down list next to it.

Editing ranges
Once you created a range, you can easily tweak it's start and end positions by hovering range boundaries with the mouse pointer, grabbing them and dragging to the left or to the right.
{{< figure src="en/ardour7-editing-ranges.gif" alt="Editing ranges" >}}
If you forgot to include a track into a range, you don't need to redo the range selection. Just hold Ctrl button and click on the track's header on the canvas. Alternatively, hold Ctrl and click on track's name in the Tracks & Busses tab of the Editor List dock.
{{< figure src="en/ardour7-adding-track-to-range.gif" alt="Adding track to range" >}}
Playing back ranges in a loop
Returning to our rhythmic passage example, we will want to hear the passage we are composing, perhaps as a loop, while we are moving the samples around. To do that, we must create a range to listen to within our session, so that we can return to exactly this point in the session again and again.
{{< figure src="en/ardour7-loop-range-menu-command.png" alt="Loop Range in the right-click menu" >}}
Zoom out if needed (-) to see full bars in the timeline. Use the Range tool to select an entire bar, then right-click inside a range and pick one of the two commands:
-
Loop Range (on the screenshot above) to create a loop and start playing it immediately.
-
Set loop from selection to only create loop markers withut immediate playback.
{{< figure src="en/ardour7-looped-range-playback.png" alt="Looped range playback" >}}
As long as loop markers are there, you can start playing back that portion of the timeline in a loop whenever you like (on the screenshot above). To do that, either click the Play loop range button in the Transport toolbar or press the L shortcut.

You can also tweak the position of loop markers while playing the range in a loop. Just grab a marker and drag it to the left or to the right.
More editing options for ranges
There are more operations you can do on ranges, all available in the right-click menu:
- Separate will cut the original regions at range borders.
- Duplicate will create one copy of the range and place it starting at the right border of the range. Any existing data will be overlaid, so you can still access it.
- Crop Region To Range will trim affected regions to the extent of the range.
You can also inspect loudness and spectral characteristics of data in a range or export just the data inside a range rather than the entire session (see this chapter for more info on exporting ranges).
Continuing
In the next step, we will learn about working with regions to compose a rhythm with these samples.
Next: WORKING WITH REGIONS