Using plugins
Plugins can be used to enhance or transform the sound of individual tracks.
They can be applied directly to a single track, or to a group of tracks using a send. Later in this tutorial, we will discuss some plugins specific to the Mixing process, such as Compressors, Limiters, Parametric Equalizers, Reverbs and others.
Processor Box
In Ardour terminology, a processor is anything that gets plugged into a mixer strip and treats the signal in some way. Ardour provides several built-in processors such as the fader or panners. Processors can also be plugins used for effects or as instruments, as well as sends or inserts which affect signal routing. The arrangement of processors is arbitrary, and there is no limit to how many there can be.

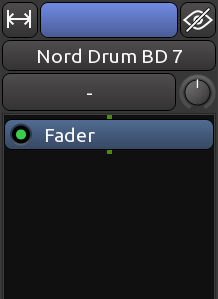
The main space shown in the screenshot above is the processor box. The blue box fader is in fact a processor that comes by default inside the processor box. It represents the fader that you use to control the track’s volume. All processors are shown as colored rectangles, with a small “LED” beside them that lights up when the processor is enabled. The colour of the processor depends on its location in the sequence; processors that are pre-fader are colored in red, and post-fader processors are colored in green.
Adding a Plugin to a Track or a Bus
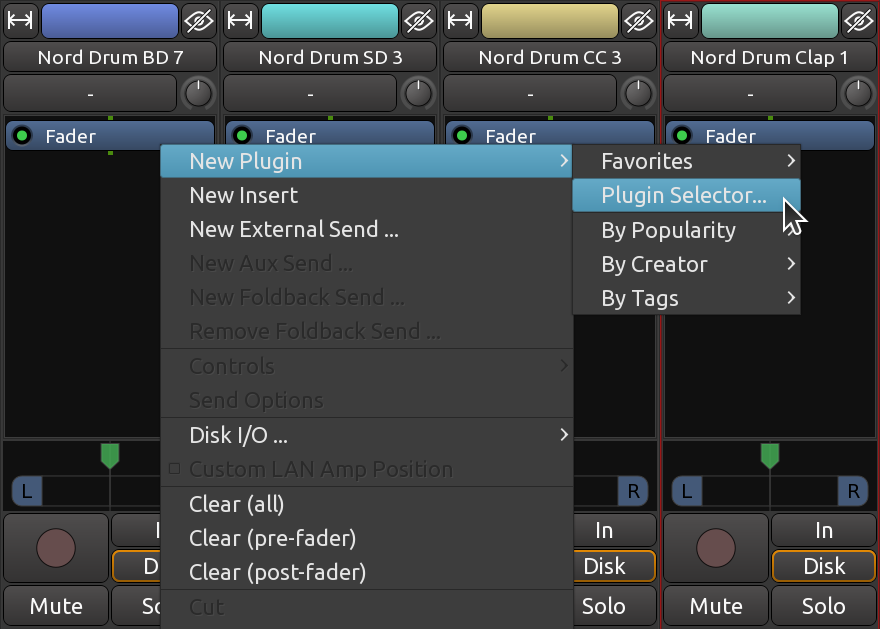
Plugins can be added by right-clicking in the processor box of the track or bus. A menu of options is presented. From the menu, new processors can be inserted.

The Plugin Selector is a convenient way to browse and choose plugins:

From the Plugin Selector, you can search them by name, type, or other criteria available from the drop-down menu. Let’s add the reverb plugin called ACE Reverb:

Once selected, click Add and the plugin will show up in the bottom list of “Plugins to be connected”. Then click Insert Plugin(s), and they will show up in the processor box.

Editing Plugin Parameters
Double-click a plugin to edit its parameters. In this example, we double click the “ACE Reverb” red box and get this window:

Here you can control reverb parameters such as Blend and Room Size. The effect will apply to all sounds contained in the track.
Double-click on a slider to switch to numeric input mode, type the new value in, then press Enter to confirm the change or Esc to abort.
Bypassing Plugins
To bypass the plugin, press the Bypass button in the plugin settings window, or simply click the LED of the plugin in the processor box. This turns the plugin off and allows the signal to pass by it unaffected. This is useful when you want to compare how a track sounds with and without the plugin.

Bypassed plugins are shown with the LED turned off.
Right-clicking the plugins will give a menu with several options, including Delete.
Pre-Fader vs Post-Fader
You have a choice whether you would like to add your plugin before or after the fader rectangle in the processor box. Pre-fader plugins are inserted in the signal path before the fader, so that the fader controls the level of the signal coming out of the plugin. Post-Fader Plugins are inserted after the fader: the fader controls the level of the signal going into the plugin.
For some plugins, Pre- or Post-fader placement does not matter. For others, the difference is subtle. For others still, inserting them in the right place is absolutely essential (for more details, see for example this thread at the Ardour discussion forum).
Plugin Formats
For those interested in learning more about plugin formats, here’s a quick overview:
LADSPA plugins are a somewhat obsolete plugin format mainly used on Linux.
LV2 is an extensible successor to LADSPA. LV2 plugins are available on Linux, Windows, and macOS, should respective developers choose to build them for these systems.
AU plugins are the native plugin format for macOS and will only work in that operating system.
VST plugins is fairly common on both Windows and macOS. Some VST plugins built for Windows can be used on Linux, however they may not function correctly and require 3rd party software to run. Others are built natively for Linux and tend to work fine.
More information about using plugins with Ardour can be found in the user manual.
Continuing
In this chapter, we learned how to add a plugin to a single track. This is useful if that track needs a specific plugin, but if you have a plugin which is used for many tracks at the same time, you should continue to the next chapter about using sends. You can also continue to the various, plugin-specific chapters such as Dynamics and Equalizing.
Next: USING SENDS